Greetings from Texas

MightyT120

Grasshopper
Joined
May 20, 2021
Messages
6
Reaction score
1
Points
3
Location
Fort Worth TX
Country flag
Hello everyone!

My name is Jeff - my current ride is a 2017 Triumph Bonneville T120. I’ve been looking at putting a Vetter Windjammer on it for awhile now, and after a long search have purchased a NOS Windjammer 4. Probably will be awhile before I can get the brackets fabricated and install the fairing, but wanted to say hello, and looking forward to getting some pics posted soon!
 
Welcome Jeff! I wonder if the old Triumph mounts would be anywhere near correct for the modern frames?
 
Unfortunately I doubt they would work - mine has a radiator! They went to liquid cooled in 2017, and the radiator is in front of the down tubes.
The good news is right behind the steering head, on the bottom, there is a flat area with two threaded holes that are about 5/16 or so … a potential mounting point!

more fun to be had - the WJ IV showed up today - it was claimed to be NOS, but someone had done some work … but I think I can still make a go of it. The mounting area has been routed for additional clearance and the rear bolt hole is missing. The rest of the fairing looks brand new.
350A1887-9EAD-406C-8EC9-E0BEEBFB1B42.jpeg
 
And from bad to worse after doing some further looking … someone got a little crazy with a router. Hoping that I can salvage. Ugh.


DB9A96E3-71CB-475C-A065-97828E9760F1.jpeg
 
No clue. The seller was clearing out a warehouse, and it was sold as basically unused.

Thoughts on whether or not it is salvageable?
 
Yes it most likely will be. I'm sure there's a good repair thread on here somewhere. On www.craigvetter.com they've got what's called a Hotcha repair kit, it's one of the best adhesives for ABS plastic, I'm not sure what you should make patch panels from, or if the Hotcha kit can be used as filler.
 

It says the kit comes with scraps of ABS plastic sufficient to repair most any problem, your issue may or may not need additional ABS material.

And instructions:

I looked up ABS plastic on EBay and first found seller Popdisplays, they have a variety of ABS sheet thicknesses if you need more material to make patch panels from.

Hope it helps.
 
After getting an original Vetter bracket, there is, IMO, not enough meat to mount this securely. I’ll try to get some pics posted when I have time. The good news is I found an unmolested fairing for my project, and may use this one for parts at least …
 
You could run a piece of metal down the inside to fabricate the rear mounting hole.
 
Could I do that for both front and back? The mounting hole in the picture is several inches back from the original forward mounting hole …
 
Welcome to the forum Jeff!! Super fun project, please post share and post! We love to keep up on members projects.
 
My Windjammer 4 was cut like that to mount it on a 6 Cylinder Kawasaki Z1300 Touring Bike. It was done under contract by Vetter as requested by Kawasaki and the data plate on my Windjammer has Kawasaki on it instead of Vetter. It was cut like that to clear the gigantic radiator they used on that bike. I took that Windjammer 4 fairing off that bike along with the bags and trunk from a Z1300T motorcycle sitting in a junk yard. All that stuff is now on my Honda VLX VT600CD motorcycle. The bikes odometer had just 23 miles showing and suffered a crash where it ended up in that junk yard. Apparently the owner purchased more motorcycle than he could handle. Also reviews say that motorcycle wallowded around through curves and was hard to handle in all other riding conditions.
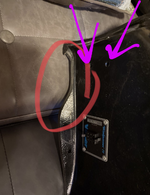
There were two brackets that attached to the bottom of the fairing, a left and a right side. Both bolted to brackets welded on the bikes down tube frames. Just a single 1/4-20 bolt, nut, and steel and rubber washers held them to the fairing bracket on each side. There was a second set of brackets that attached to the head tube with a cross brace with 1/4-20 bolts, nuts, and steel and rubber washers going through the fairing in what was the open space where room was made for motorcycles with headlight shells that were not removable from the triple tree. If you look at that area of the fairing you will most likely find two holes already drilled for that bracket assembly. I used a couple of clamps to attach part of the bracket assembly to the head tube of my motorcycle and also reused it on my Bike. I did attempt to simply drill a couple of extra mounting holes in the lower fairing mount surfaces and use just the lower bracket for mounting but the cut parts of the fairing made it too weak and caused the fairing to oscillate at speed. That's when I installed the upper "Head tube" mount, which solved the problem. I did attempt to sandwitch that part of the fairing with the bracket and another peace of flat steel to give the fairing support without needing to resort to using the upper bracket assembly but that attempt failed. I'm sure that fairing was made for use on Kawasaki Z1300 motorcycles and never sold which is why it's NOS.
 
I think my Vindicator (#31-300851 3rd off the line) has similar but lighter cutouts. I'll have to get a photo next time I'm in storage.

Vindicators were made specifically (but not exclusively) for Kawasaki, mine spent part of it's life on a 74 CB750 and might see some time on one of mine one day.
(Insert ratchet sound here)

Jeff it looks to me like there are two holes drilled into the fairing's inner surface...liner? The wavy surface black ABS inside vs the painted exterior.
It looks to me like the intention was to use these two holes to recreate the rear mounting surfaces with some sort of custom brackets that would mount to the bike mount.
 

Attachments

  • Screenshot_2021-07-11-15-19-04~2.png
    Screenshot_2021-07-11-15-19-04~2.png
    1.3 MB · Views: 160
I took a few photos while I was at storage today, these are the mounting areas of a WJ3, Vindicator and a WJ-SS. There is some slight variation in how each was trimmed to better fit whatever bike it was originally mounted to. Nobody ever expected them to be around this long but well made products age gracefully.
 

Attachments

  • IMG_20210714_144530.jpg
    IMG_20210714_144530.jpg
    131.8 KB · Views: 142
  • IMG_20210714_144523.jpg
    IMG_20210714_144523.jpg
    135.2 KB · Views: 140
  • IMG_20210714_144517.jpg
    IMG_20210714_144517.jpg
    130.9 KB · Views: 147
Last edited:
Back
Top