Rear Turn Signal lights for saddlebag brackets

Scott-E

Vetter Aficionado
Joined
Jan 27, 2016
Messages
343
Reaction score
175
Points
43
Location
Weaver, AL
Country flag
I hope I'm posting to the correct place so forgive me if not.

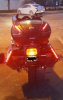
I had a frighting incident happen a few nights ago. I was stopped for oncoming traffic while attempting to make a left turn. The person behind me apparently could not wait and so passed on my right. He came so close I thought he was going to hit my right saddlebag. Considering I have only a centre tail and brake and the bags are black I figure he did not comprehend how wide my bike is with those Vetter Saddlebags. I decided to replace my single function amber turn signal lights with red tail lights that also function as turn signal lights. After looking around I found a couple of trailer lights that would work just fine. Here are some pictures of the brackets and a light mounted to one along with one of them temporarily mounted just to see what it would look like and make sure the saddlebag would clear it and it would still come off and go on as normal. Everything worked as it should so I'm going to finish it up soon. I will post a completed picture once I'm finished with it.
BTY the red lens is almost flush with the bag bumper. It sticks out just enough so the light is visible from the sides. I consider that perfect.

S5030040.jpg

S5030041.jpg

S5030042.jpg
 
It was just getting dark when I finished the new lights. I need to take a better picture as this one's a little shaky but it'll do until I take a better one. I like the additional lighting in the back. Perhaps I'll be seen a little better now after dark.
S5030043.jpg
 
Nice idea, but something tells me that even that driver still wouldn't have cared to see you. Every little bit helps though.
 
Because I have Givi luggage I use in addition to the Vetter luggage, I have an Admore lighting controller on the bike. I picked up some red LED light strips from Autozone and an extra set of Admore bag side connectors. The LED strips I mounted on the edge of the doors and I connected them through the connectors to the Admore lighting controller. It gives me running, brake and turn signals at the outer most edge of my luggage.

Sadly I have to agree sometimes no matter how much lighting you have some drivers will never see us.
 
This morning at Breakfast one of our coffee klatch members (a nice way of saying a bunch of old guys hanging out) handed me a 4" LED rubber grommet mounted tail light from Harbor Freight and told me if I could figure out how to mount it without the grommet I could keep it. He said he wanted to mount them on a single wheel trailer he pulls behind his Honda Gold Wing. He wants to mount them like I mounted the lights on the rear of my bike. One caveat was that he would be able to copy my design using only a small drill press and a hack saw.

Here's how I did it.
I used a peace of 1/2" 18 gauge square tubing I scrounged out of my surplus steel box.
Two, 8-32 X 1 1/2" screws and 4 nuts.
One, 10-24 X 3/4" screw and nut.
A 3/8-16 X 3" carriage bolt.
13 3/8" long by 1/2" wide strip of rubber cut from a scrap inner tube.
4 1/2" hose clamp.

Cut the 1/2" 18 gauge square tubing to your desired length.
Drill two, 3/16 holes 4" apart with one of the holes close to the end of the the 1/2" tubing.
Cut the head off the carriage bolt and slide that end into the tubing leaving 1 1/4" sticking out.
Drill a 3/16" hole 1" from the end drilling through the tubing and 3/8" carriage bolt within the tubing.
Push the 10-24 screw through the hole and lock it in place with the nut.
Screw 8-32 nuts on both 8-32 screws leaving 3/4" space between the nut and screw head.
Push 8-32 screws into 3/16 holes and lock both in place with 8-32 nuts.

Wrap the rubber strip around the edge of the LED light and use a small peace of tape to hold it in place.
Push the light up to the 8-32 screws sticking up out of the bracket aligning the wire plug with the bracket
as shown in the picture below. Place the hose clamp around the light and screws and tighten it.
Your done!
Note: you may need to use another mounting method. It's up to you to do that if required.
S5030046.jpg


S5030045.jpg
 
Finished the rear LED turn and tail lights today. They guy that challenged me dropped by and asked if I would fabricate brackets for his trailer. He also asked if I would take a second LED light in trade for that. He had 3 LED lights with him. I made his brackets as well as another one for my own bike. Here it is with the new LED lights.

S5030047.jpg
 
Just a thought. LED's are obviously brighter, however as we normally see it, turn signals are commonly orange. Would it not be better to do orange LED turn signals in their proper place and put an additional tail light LED in other location, maybe below the stainless strip?
 
Just a thought. LED's are obviously brighter, however as we normally see it, turn signals are commonly orange. Would it not be better to do orange LED turn signals in their proper place and put an additional tail light LED in other location, maybe below the stainless strip?
DOT allows Yellow or Red turn signals on the rear. Technically you can have Yellow Tail Lights as well but that would confuse most people. With the way I have it now I simply have 3 tail lights with the two outside tail lights becoming turn signals as well. Most modern vehicles do have separate brake, tail, and turn signals but some vehicles (usually trucks) still have combination tail, brake, and turn signals incorporated into two lights.

Speaking of that I'm considering building the 3 to 2 relay circuit below which would allow the tail and turn signal lights to function as brake lights as well. When stopping all three lights function as brake lights. When activating the turn signals 1 of the outside lights will blink signalling the turn while the other 2 lights will still function as brake lights. This would significantly improve the reaction time of following drivers when all three lights go bright red when braking. The circuit below does the same thing as one of those 3 to 2 trailer converters except there is no voltage loss and resulting dimmer lights. Instead of connecting this circuit to a trailer I'll be connecting it to my two LED lights. My centre Tail/Brake light will function like the third middle tail and brake lights on modern vehicles.

Orange=Left turn light.
Light Blue=Right turn light.
Green w/Yellow=Stop lights.
Brown=Tail Lights. That relay is optional for use with an optional trickle charger.

27043_061149_480000000.gif
 
I'm not trying to steal the post but I finally got a picture of my lights with the Vetter saddlebags and the Admore light controller.
 

Attachments

  • 20160417_045056.jpg
    20160417_045056.jpg
    1.6 MB · Views: 550
I've been thinking of doing something similar. The chrome on my saddlebag bumpers is flaking off which apparently is a common problem. I attempted to make them look better by wire brushing away all the loose chrome and rust and paint them flat black. They looked good for a while but now their looking bad again as more chrome has flaked off taking paint with it. I ended up covering them with 3/4" split loom tubing. It turned out looking pretty good. After looking around the internet for some colours other than black for some added bling or perhaps red with reflective property’s so they would light up when hit with headlights. None of it has reflective property’s but I discovered 1" split loom tubing comes in clear. I think 1" would work and I could put Red and Amber LED Strip lights inside the tubing. It would mean adding quick connect wire plugs on the wires connected to the saddlebags so they could be removed and replaced easily. The same is required for the Tail Box. I've also thought about replacing the rear bumper (flaking) chrome bumper with 3/4" wide aluminium strips and sticking LED strips to those. I would drill holes to match the SMD LED's on the strips so the strips could be mounted behind the aluminium strips to add protection and reflective tape could be stuck to the surface of the aluminium strips. That may be the best solution.
 
The split loom is an interesting idea, my only question is how would you seal it so the bags are water proofed? The Admore lighting kit came with quick disconnects for two bags (color coded for left and right). I had to buy a second set so I could use them with both the Givi and Vetter luggage. As for the top box Givi makes a button contact that installs in the base plate for the top box when it is snapped down it makes contact.
 
Just saw where you put the split loom... nevermind about sealing. My saddlebags didn't come with the rear bar I just replaced the hardware in the mounting holes with decrative license plate hardware.
 
Just saw where you put the split loom... nevermind about sealing. My saddlebags didn't come with the rear bar I just replaced the hardware in the mounting holes with decrative license plate hardware.
I can understand why they were missing the rear bar bumpers. Once the chrome start flaking off they look like crap. People simply take them off and forget they were ever there.

There's no easy way of completely removing the chrome short of sand blasting. I did try to find someone that would do that for me as I don't have any sand blasting capability at home. Every place I took them that could sand blast them wanted nothing to do with my flaking chrome parts. They all said that chrome would screw up their sand blast cabinet and equipment.

This morning a Policeman suggested ordering blue and red split loom tubing and putting blue on one side and red on the other. He said it would complete that "Police Motorcycle" look I have going. He told me there is nothing illegal about that as it's just tubing and they can't light up and flash. He's been asking me if I want to sell it. No way I'm going to sell the "Frankencycle".
 
Last edited:
I do have the side rails on mine, I had to hand sand them to get the chrome off before having them sand blasted. The chrome was mostly gone and it was starting to pit so sanding just made them smooth and ready for powder coating. Only thing I am missing now is the end caps. I dont notice them so I may not do anything about it for awhile.
 
I finished building and installing the 3 to 2 converter and installed it. Now I have 3 tail lights, 3 brake lights, and still have 2 brake lights when one of the lights is signalling a turn. I've also noticed other drivers back off quickly when my 3 brake lights light up. At night the bike looks a lot bigger with 3 tail lights as well. I made a short youtube video of the lights working.
 
Back
Top